We recently received the photos below from Steve, an avid Plasti Dip fan and Garage Rock fanatic. Here is his project story;
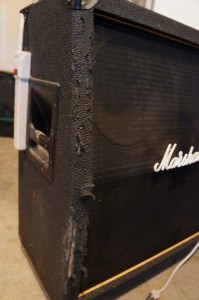 “My wife’s out at a car boot sale and she calls and says there’s this Marshall thing at a sale for £20.00 and wants to know if she should buy it. I let her know that if it says Marshall on it, the answer is always ‘Yes.’ She comes home and it’s a 4×12 Marshall cabinet and it’s seriously beaten up and dirty, but I connect it to my amp and it sounds amazing!
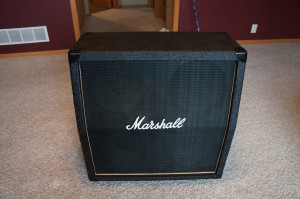
“I don’t know how to upholster, so I cut the fabric off the bottom of the cabinet, and glue and patch the holes and clean up all the torn and scraped up areas. Then I sprayed the whole cabinet with a few coats of Plasti Dip.”
How great is the final result?! What a brilliant fix-it idea and exceptionally well-executed too. It looks brand new!
Thank you to Steve for sharing his fantastic project with us and other Plasti Dip followers.
Of course, speaker cabinet repairs aren’t the only Rock n’ Roll application for Plasti Dip.
You might want to consider…
- Giving your guitar or drums a new, but easily removable make-over
- Coating the base of microphone stands to prevent scuffing on hard floors
- Repairing damaged rubber feet on drum and cymbal stands
- Creating removable bass drum head designs
- Colour-coding amp cables so you can see at a glance which plugs go where. The Create Your Colour Kit is ideal for this purpose
- Using a light coat of Plasti Dip to repair ripped speaker cones
- Repairing damaged power or amp cables with exposed wiring is easy with Liquid Electrical Tape
- One final idea for true Rock n’ Roll fans: Get the whole band together and coat all your gear with Plasti Dip and Gold Metalizer for the WOW factor!
 Rock music is known for its unique DIY style and Plasti Dip is the world’s greatest DIY tool. So why not get creative and have some fun with it?!
No doubt some of the more musically-inclined Plasti Dip fans out there have put the two together and have a cool project to share.
Let us now via Twitter or Facebook or send us an email and show off your creation to the world. Be proud of it and don’t forget to tell us the story behind it.
We love it when you share your enthusiasm with us.
Go Camping – Easy Repairs
I’m sure that all you avid campers out there can relate to this project on some level. You might even have experienced something similar yourself. Why not have a read of this Plasti Dippers story which might help you if you ever need to repair your trusty caravan, camper van, tent or awning…
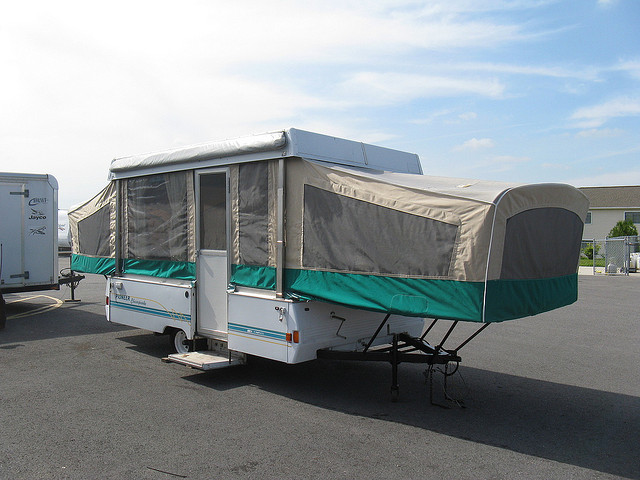
“A good friend of mine is something of an outdoor enthusiast. He was tickled pink earlier this year when he was able to purchase a used hybrid travel trailer. It was far from ready to use when he bought it and was in dire need of multiple repairs. Over the course of the summer, I’ve been periodically helping him fix up the camper, and more than a few times Plasti Dip’s products have really come in handy.
One of his first tasks was to set up the camper and open all its doors, windows, pop-outs, etc. It had been parked behind the garage of the guy my friend bought it from for a few years, and it smelled awful to put it mildly.
The first night my friend had the travel trailer parked in his driveway to air out and typically it rained. This actually seemed to help quite a bit with the smell, but it also led to the discovery of multiple pinprick holes in the vinyl shells over the pop-out bunks.
The helpful and resourceful fellow that I am, I immediately suggested VLP (Vinyl & Leather Repair Kit) to fix the holes. Finding all the holes took almost an entire day. But that was the only hard part because applying VLP is about as difficult as squeezing a tube of toothpaste and it worked like a charm…no more drips!
My friend’s camper is pretty much a “no-frills” model, but there is some electrical wiring, which to no suprise, needed to be almost completely redone. My contribution to this part of the project was Plasti Dip’s Liquid Electrical Tape. The Liquid Tape was a resounding success and everything worked. It helped us fit spliced wiring through some tight spaces where electrical tape-wrapped wires surely wouldn’t have fit.
Much later in the project, my friend was tackling the problems on the outside and all but one of the support arms that brace the pop-outs were covered in rust. After some work with a wire brush, he was pleased to discover that it was only surface rust with no rust-through or structural damage. Rather than repaint the support arms with regular spray paint, I suggested spray-on Plasti Dip. Again success! Plasti Dip gave the arms a uniform, painted look and because it has some flexibility, it doesn’t chip off like normal paint does.
The final Plasti Dip product application came into play when my friend finally unrolled the camper’s canvas canopy. It had a rip running almost its full length, at the edge where it attaches to the horizontal roll-up bar. The solution we came up with was more involved than the others and was a real stroke of genius… if I do say so myself.
First, the lazy man’s fix-all: duct tape. We duct taped the canopy back together across the top surface just to hold it in place. Then we used VLP to form a light bond. Suspecting that VLP wouldn’t be enough to hold such a large tear, we then used original Plasti Dip to “paint over” the rip and the VLP. Once it had dried, we tentatively removed the duct tape and lo and behold… it held! We repeated the process across the top of the canopy, first VLP-ing, then Plasti Dip-painting over the tear.
It’s by no means a perfect solution (as the white Plasti Dip doesn’t quite match the white canvas), but it’s good enough for now. Somewhere down the road the canopy will likely have to be completely replaced. But my friend was hoping to have his Travel Trailer ready to take his daughter camping over the holidays, so this solution was perfect for him.”
Thanks to a lot of elbow grease, a little innovation, and several Plasti Dip products they’re good to go…. Have a good trip O’Brien family!
Kitchen Craft – Retro
 Summer is upon us and with it the camping season is underway. We have also talked about using Plasti Dip products for assorted camper repairs…but what about camper accoutrements or more specifically, crafts for your camper’s kitchen? Cathe Holden created two brilliant retro-styled Plasti Dip craft ideas that are great for any kitchen – in a camper or elsewhere!
It seems Holden’s family recently purchased a shipshape 1972 travel trailer, complete with all-original faux-wood paneled walls, avocado green upholstery and harvest gold appliances. Rather than redo the interior, Cathe smartly decided to roll with the ‘70s vibe and turn the kitsch up a notch.
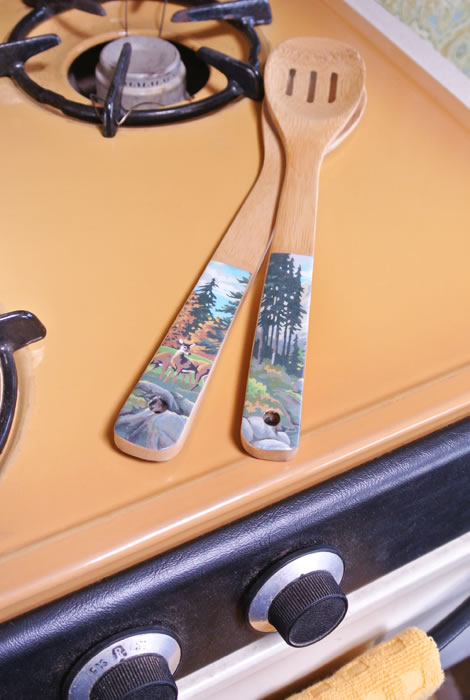
First, she created bamboo kitchen utensils featuring tranquil nature scenes (perfect for camping in the great outdoors). She cut out strips of colour copies of Cathe’s favourite Paint-by-Number images were laminated onto the utensils’ handles. Then she dipped the handles in clear Plasti Dip to seal out moisture. After two coats and ample drying time they look amazing!
For her second kitschy camper kitchen craft Cathe created a set of “embossed” kitchenware. Again using bamboo utensils, she added three-dimensional stickers to the handles. Then using the Create Your Colour Kit she developed a batch of avocado green Plasti Dip that perfectly matches the upholstery of her camper.
image courtesy of Cathe Holden
justsomethingimade.com
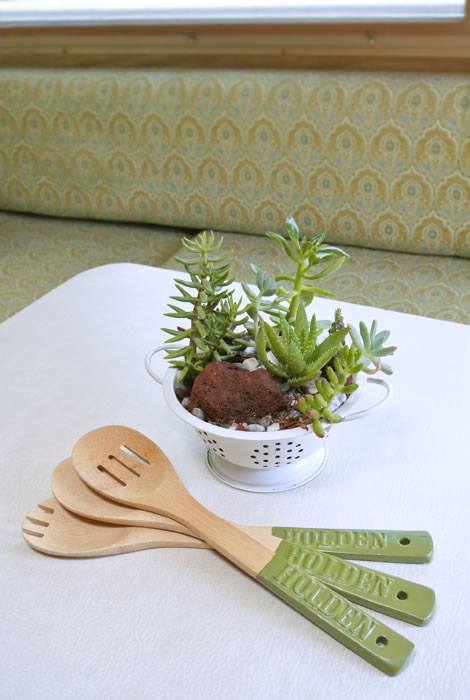 Using a sponge brush Cathe painted on the Plasti Dip nice and thick so as to fully cover the raised letters. Three coats did the trick and after drying, the letters really do look like they’re part of the handles themselves.
Thank you Cathe, what a very creative lady you are.
Has this given you the inspiration to go and get creative? I know I’m desperate to get my hands on the Create Your Colour Kit so that I can go wild with creativity this weekend…what can I personalize next?!
If you have been inspired and do find yourself being creative with your own project, please share your creation with us via Twitter or Facebook or send us an email and show off your project to the world. Be proud of it and don’t forget to tell us the story behind it and include some great photos to really show off your handywork.
So come on DIYers, let’s get Plasti Dipping around the house…hmmmmm what else can I use it on?
image courtesy of Cathe Holden
justsomethingimade.com